There seems to be an number of tutorials availalble. Most are outdated.
sudo apt-get install xserver-xorg-input-vmmouse open-vm-tools
is all you need.

sudo apt-get install xserver-xorg-input-vmmouse open-vm-tools
is all you need.
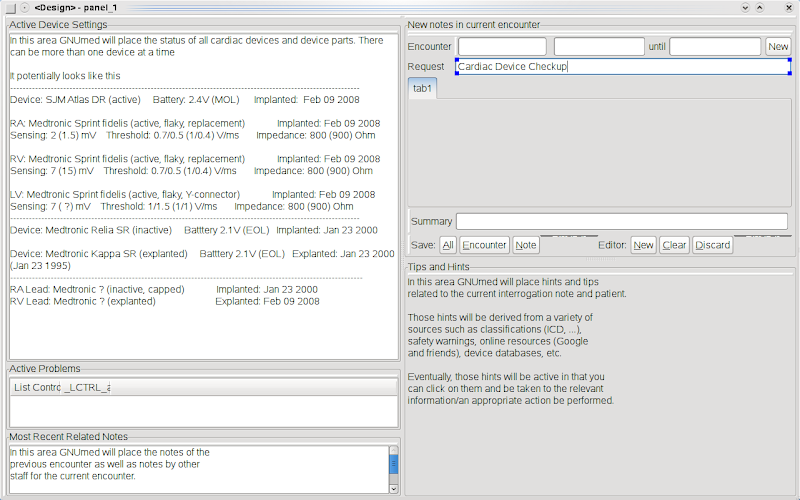
<?xml version="1.0" encoding="UTF-8"?>This is a simplified version. It lacks the actual measurements. Next step is to learn how to transfer that XML to a human readable form so I can display it in the left upper section of the plugin.
<!-- New document created with EditiX at Wed Apr 29 15:37:23 CEST 2009 -->
<CardicacDevices>
<DevicePart type="generator">
<class>AID</class>
<type>generator</type>
<isactive>yes</isactive>
<dateofimplant></dateofimplant>
<dateofexplant></dateofexplant>
<isexplanted>no</isexplanted>
<comment></comment>
<implantsite>subpectoral</implantsite>
<implantregion>right subclavian</implantregion>
<GeneratorPart type="CPU" >
<manufacturer>SJM</manufacturer>
<model></model>
<serial></serial>
</GeneratorPart>
<GeneratorPart type="Battery">
<manufacturer></manufacturer>
<serial></serial>
</GeneratorPart>
</DevicePart>
<DevicePart type="lead">
<manufacturer> </manufacturer>
<model></model>
<polarity></polarity>
<serial></serial>
<isactive>yes</isactive>
<hasYconnector>yes</hasYconnector>
<dateofimplant></dateofimplant>
<dateofexplant></dateofexplant>
<isexplanted> no</isexplanted>
<leadposition>RV</leadposition>
<leadslot>RA</leadslot>
<comment></comment>
<connectedtodevice>aid</connectedtodevice>
<connectedtodevice>RVlead</connectedtodevice>
</DevicePart>
</CardicacDevices>


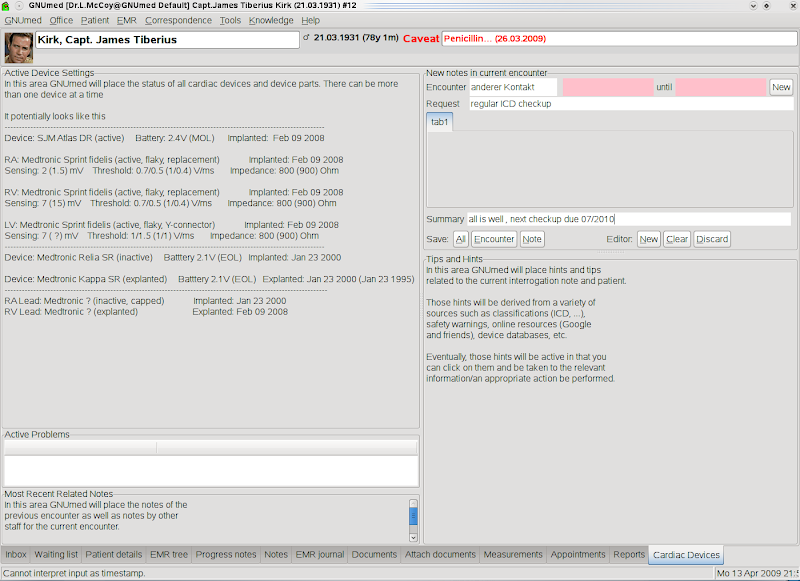

class wxgCardiacDevicePluginPnl(wx.ScrolledWindow):The import statements to my wxgCardiacDevicePluginPnl.py. It now actually shows up in GNUmed. Horray. But it crashes when trying to load data. this should be easy to fix.
def __init__(self, *args, **kwds):
from Gnumed.wxpython.gmNarrativeWidgets import cSoapNoteInputNotebook
from Gnumed.wxpython.gmDateTimeInput import cFuzzyTimestampInput
from Gnumed.wxpython.gmEMRStructWidgets import cEncounterTypePhraseWheel
from Gnumed.wxpython import gmListWidgets
# begin wxGlade: wxgCardiacDevicePluginPnl.__init__
gm.gui (/home/basti/sources/gnumed/gnumed/Gnumed/wxpython/gmExceptionHandlingWidgets.py::handle_uncaught_exception_wx() #49): unhandled exception caught:That is no surprise since I decided to put the class cCardiacDeviceMeasurementsPnl into gmMeasurementWidgets.py and did not copy all stuff from gmSoapWidgets. What I effectively missed is to copy all the needed functions like _populate_with_data().
Traceback (most recent call last):
File "/home/basti/sources/gnumed/gnumed/Gnumed/wxpython/gmHorstSpace.py", line 231, in _on_notebook_page_changed
new_page.receive_focus()
File "/home/basti/sources/gnumed/gnumed/Gnumed/wxpython/gmPlugin.py", line 183, in receive_focus
self._widget.repopulate_ui()
File "/home/basti/sources/gnumed/gnumed/Gnumed/wxpython/gmRegetMixin.py", line 128, in repopulate_ui
self.__repopulate_ui()
File "/home/basti/sources/gnumed/gnumed/Gnumed/wxpython/gmRegetMixin.py", line 66, in __repopulate_ui
self._data_stale = not self._populate_with_data()
File "/home/basti/sources/gnumed/gnumed/Gnumed/wxpython/gmRegetMixin.py", line 79, in _populate_with_data
raise NotImplementedError, "[%s] _populate_with_data() not implemented" % self.__class__.__name__
NotImplementedError: [cCardiacDeviceMeasurementsPnl] _populate_with_data() not implemented

class gmCardiacDevicePlugin(gmPlugin.cNotebookPlugin):in gmCardiacDevicePlugin.py tells me that in the case of the Document archive plugin we borrowed from the class cSelectablySortedDocTreePnl is located in the file gmMedDocWidgets. The name implies that this is a collection of classes of medical document widgets. The device parameters are essentially measurements.
def GetWidget (self, parent):
self._widget = gmMedDocWidgets.cSelectablySortedDocTreePnl(parent, -1)
return self._widget
#================================================================
class cCardiacDeviceMeasurementsPnl(wxgCardiacDevicePluginPnl.wxgCardiacDevicePluginPnl, gmRegetMixin.cRegetOnPaintMixin):
"""Panel holding a number of widgets to manage implanted cardiac devices. Used as notebook page."""
def __init__(self, *args, **kwargs):
wxgCardiacDevicePluginPnl.wxgCardiacDevicePluginPnl.__init__(self, *args, **kwargs)
gmRegetMixin.cRegetOnPaintMixin.__init__(self)
self.__init_ui()
self.__register_interests()
#--------------------------------------------------------
# event handling
#--------------------------------------------------------
from Gnumed.wxGladeWidgets import wxgMeasurementsPnl, wxgMeasurementsReviewDlg
from Gnumed.wxGladeWidgets import wxgMeasurementEditAreaPnl
from Gnumed.wxGladeWidgets import wxgCardiacDevicePluginPnl
class gmCardiacDevicePlugin(gmPlugin.cNotebookPlugin):
def GetWidget (self, parent):
self._widget = gmMeasurementWidgets.cCardiacDeviceMeasurementsPnl(parent, -1)
return self._widget
from Gnumed.wxpython import gmMeasurementWidgets, gmPlugininstead of
from Gnumed.wxpython import gmMedDocWidgets, gmPlugin, images_Archive_pluginIf you followed the above steps you might notice that the plugin throws many errors in the file gnumed.log. This file can be viewed directly from within GNUmed. It does not show up. The reason is simple. I use a complex set of widgets that are scattered across the files gmMeasurementWidgets and gmNarrativeWidgets.

Traceback (most recent call last):This is due to the fact that the class name and the file name (gmCardiacDevicePlugin) due not match. Open the file and change the class name.
File "/home/basti/sources/gnumed/gnumed/Gnumed/wxpython/gmHorstSpace.py", line 121, in __load_plugins
plugin = gmPlugin.instantiate_plugin('gui', curr_plugin)
File "/home/basti/sources/gnumed/gnumed/Gnumed/wxpython/gmPlugin.py", line 333, in instantiate_plugin
plugin_class = module_from_package.__dict__[plugin_name]
KeyError: u'gmCardiacDevicePlugin'
class gmCardiacDevicePlugin(gmPlugin.cNotebookPlugin):The section 'Menu Info' is responsible for the name of the plugin in the GNUmed menu. I changed it like this and while we are at it the notebook tab name as well.
"""Plugin to encapsulate document tree."""
tab_name = _("Documents")
def name (self):
return gmCardiacDevicePlugin.tab_name
class gmCardiacDevicePlugin(gmPlugin.cNotebookPlugin):
"""Plugin to encapsulate document tree."""
tab_name = _("Cardiac Device")
def name (self):
return gmCardiacDevicePlugin.tab_name
#--------------------------------------------------------
def GetWidget (self, parent):
self._widget = gmMedDocWidgets.cSelectablySortedDocTreePnl(parent, -1)
return self._widget
#--------------------------------------------------------
def MenuInfo (self):
return ('tools', _('Show &cardiac devices'))